IntroductionThis is the second section of the FreeType 2 tutorial. It will teach you the following:
1. Glyph metrics:Glyph metrics are, as their name suggests, certain distances associated to each glyph in order to describe how to use it to layout text. There are usually two sets of metrics for a single glyph: those used to layout the glyph in horizontal text layouts (like latin, cyrillic, arabic, hebrew, etc..), and those used to layout the glyph in vertical text layouts (like some layouts of Chinese, Japanese, Korean, and others..). Note that only a few font formats provide vertical metrics. You can test wether a given face object contains them by using the macro FT_HAS_VERTICAL(face), which is true when appropriate. Individual glyph metrics can be accessed by first loading the glyph in a face's glyph slot, then accessing them through the face->glyph->metrics structure, whose type is FT_Glyph_Metrics . This will be detailed later, for now, we'll see that it contains the following fields:
NOTA BENE: As all fonts do not contain vertical metrics, the values of vertBearingX, vertBearingY and vertAdvance should not be considered reliable when FT_HAS_VERTICAL(face) is false. The following graphics illustrate the metrics more clearly. First, for horizontal metrics, where the baseline is the horizontal axis : 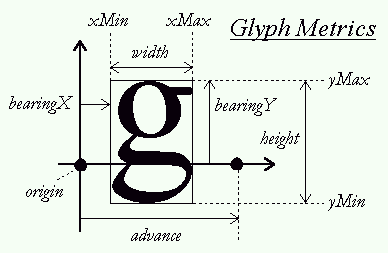 For vertical text layouts, the baseline is vertical and is the vertical axis: 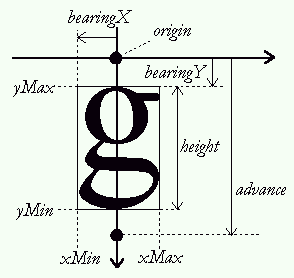 The metrics found in face->glyph->metrics are normally expressed in 26.6 pixels (i.e 1/64th of pixels), unless you use the FT_LOAD_NO_SCALE flag when calling FT_Load_Glyph or FT_Load_Char. In this case, the metrics will be expressed in original font units. The glyph slot object has also a few other interesting fields that will ease a developer's work. You can access them though face−>glyph−>xxx where xxx is :
2. Managing glyph images:The glyph image that is loaded in a glyph slot can be converted into a bitmap, either by using FT_LOAD_RENDER when loading it, or by calling FT_Render_Glyph. Each time you load a new glyph image, the previous one is erased from the glyph slot. There are times however where you may need to extract this image from the glyph slot, in order to cache it within your application, and even perform additional transforms and measures on it before converting it to a bitmap. The FreeType 2 API has a specific extension which is capable of dealing with glyph images in a flexible and generic way. To use it, you first need to include the FT_GLYPH_H header file, as in:
#include FT_GLYPH_H
We will now explain how to use the functions defined in this file: a. Extracting the glyph image:You can extract a single glyph image very easily. Here's some code that shows how to do it:
       FT_Glyph    glyph;    // handle to glyph image

       ....
       error = FT_Load_Glyph( face, glyph_index, FT_LOAD_NORMAL );
       if (error) { .... }

       error = FT_Get_Glyph( face->glyph, &glyph );
       if (error) { .... }
As you see, we have:
It is important to note that the extracted glyph is in the same format than the original one that is still in the slot. For example, if we're loading a glyph from a TrueType font file, the glyph image will really be a scalable vector outline. You can access the field glyph−>format if you want to know exactly how the glyph is modeled and stored. A new glyph object can be destroyed with a call to FT_Done_Glyph . The glyph object contains exactly one glyph image and a 2D vector representing the glyph's advance in 16.16 fixed float coordinates. The latter can be accessed directly as glyph−>advance Note that unlike other FreeType objects, the library doesn't keeps a list of all allocated glyph objects. This means you'll need to destroy them yourself, instead of relying on FT_Done_FreeType doing all the clean-up. b. Transforming & copying the glyph imageIf the glyph image is scalable (i.e. if glyph->format is not equal to ft_glyph_format_bitmap), it is possible to transform the image anytime by a call to FT_Glyph_Transform . You can also copy a single glyph image with FT_Glyph_Copy. Here's some example code:
    FT_Glyph  glyph, glyph2;
    FT_Matrix matrix;
    FT_Vector delta;

    ......
    .. load glyph image in "glyph" ..

    // copy glyph to glyph2
    //
    error = FT_Glyph_Copy( glyph, &glyph2 );
    if (error) { ... could not copy (out of memory) }

    // translate "glyph"
    //
    delta.x = -100 * 64;   // coordinates are in 26.6 pixels
    delta.y =  50  * 64;

    FT_Glyph_Transform( glyph, 0, &delta );

    // transform glyph2 (horizontal shear)
    //
    matrix.xx = 0x10000;
    matrix.xy = 0;
    matrix.yx = 0.12 * 0x10000;
    matrix.yy = 0x10000;

    FT_Glyph_Transform( glyph2, &matrix, 0 );
Note that the 2x2 transform matrix is always applied to the 16.16 advance vector in the glyph, you thus don't need to recompute it.. c. Measuring the glyph imageYou can also retrieve the control (bounding) box of any glyph image (scalable or not), through the FT_Glyph_Get_CBox function, as in:
     FT_BBox   bbox;
     ...
     FT_Glyph_Get_CBox(  glyph, bbox_mode, &bbox );
Coordinates are relative to the glyph origin, i.e. (0,0), using the Y_upwards convention. This function takes a special argument, the "bbox mode", that is a set of bit flags used to indicate how box coordinates are expressed. If the glyph was loaded with FT_LOAD_NO_SCALE, `bbox_mode' must be set to `ft_glyph_bbox_unscaled' to get unscaled font units. If `bbox_mode' is set to `ft_glyph_bbox_subpixels' the bbox coordinates are returned in 26.6 pixels (i.e. 1/64th of pixels). Note that the box's maximum coordinates are exclusive, which means that you can always compute the width and height of the glyph image, be in in integer or 26.6 pixels with:
     width  = bbox.xMax - bbox.xMin;
     height = bbox.yMax - bbox.yMin;
Note also that for 26.6 coordinates, if ft_glyph_bbox_gridfit is set in the bbox mode, the coordinates will also be grid-fitted, which corresponds to:
     bbox.xMin = FLOOR(bbox.xMin)
     bbox.yMin = FLOOR(bbox.yMin)
     bbox.xMax = CEILING(bbox.xMax)
     bbox.yMax = CEILING(bbox.yMax)
To get the bbox in integer pixel coordinates, set `bbox_mode' to `ft_glyph_bbox_truncate'. Finally, to get the bbox in grid-fitted pixel coordinates, set `bbox_mode' to `ft_glyph_bbox_pixels'. d. Converting the glyph image to a bitmapYou may need to convert the glyph object to a bitmap once you have
convienently cached or transformed it. This can be done easily with
the
    FT_Vector  origin;

    origin.x = 32;   /* 1/2 pixel in 26.26 format */
    origin.y = 0;

    error = FT_Glyph_To_Bitmap( &glyph,
                                render_mode,
                                &origin,
                                1 );        // destroy original image == true
We will know detail this function's parameters:
The new glyph object always contain a bitmap (when no error is returned), and you must typecast its handle to the FT_BitmapGlyph type in order to access its content. This type is a sort of "subclass" of FT_Glyph that contains additional fields (see FT_BitmapGlyphRec ) :
3. Global glyph metrics:Unlike glyph metrics, global ones are used to describe distances and features of a whole font face. They can be expressed either in 26.6 pixels or in design "font units" for scalable formats. a. Design Global Metrics:For scalable formats, all global metrics are expressed in font units in order to be later scaled to device space, according to the rules described in the last chapter of this section of the tutorial. You can access them directly as simple fields of a FT_Face handle. However, you need to check that the font face's format is scalable before using them. One can do it by using the macro FT_IS_SCALABLE(face) which returns true when appropriate. In this case, you can access the global design metrics as:
Notice how, unfortunately, the values of the ascender and the descender are not reliable (due to various discrepancies in font formats). b. Scaled Global Metrics:Each size object also contains a scaled versions of some of the global metrics described above. They can be accessed directly through the face->size->metrics structure. Note that these values correspond to scaled versions of the design global metrics, with no rounding/grid-fitting performed.. They are also completely independent of any hinting process. In other words, don't rely on them to get exact metrics at the pixel level. They're expressed in 26.6 pixels.
Note that the face->size->metrics structure contains other fields that are used to scale design coordinates to device space. They're described, in the last chapter. c. Kerning:Kerning is the process of adjusting the position of two subsequent glyph images in a string of text, in order to improve the general appearance of text. Basically, it means that when the glyph for an "A" is followed by the glyph for a "V", the space between them can be slightly reduced to avoid extra "diagonal whitespace". Note that in theory, kerning can happen both in the horizontal and vertical direction between two glyphs; however, it only happens in the horizontal direction in nearly all cases except really extreme ones. Note all font formats contain kerning information. Instead, they sometimes rely on an additional file that contains various glyph metrics, including kerning, but no glyph images. A good example would be the Type 1 format, where glyph images are stored in a file with extension ".pfa" or ".pfb", and where kerning metrics can be found in an additional file with extension ".afm" or ".pfm". FreeType 2 allows you to deal with this, by providing the FT_Attach_File and FT_Attach_Stream APIs. Both functions are used to load additional metrics into a face object, by reading them from an additional format-specific file. For example, you could open a Type 1 font by doing the following:
      error = FT_New_Face( library, "/usr/shared/fonts/cour.pfb", 0, &face );
      if (error) { ... }

      error = FT_Attach_File( face, "/usr/shared/fonts/cour.afm" );
      if (error) { .. could not read kerning and additional metrics .. }
Note that FT_Attach_Stream is similar to FT_Attach_File except that it doesn't take a C string to name the extra file, but a FT_Stream handle. Also, reading a metrics file is in no way, mandatory. Finally, the file attachment APIs are very generic and can be used to load any kind of extra information for a given face. The nature of the additional content is entirely font format specific. FreeType 2 allows you to retrieve the kerning information between two glyphs through the FT_Get_Kerning function, whose interface looks like:
     FT_Vector  kerning;
     ...
     error = FT_Get_Kerning( face,                  // handle to face object
                             left,                  // left glyph index
                             right,                 // right glyph index
                             kerning_mode,          // kerning mode
                             &kerning );            // target vector
As you see, the function takes a handle to a face object, the indices of the left and right glyphs for which the kerning value is desired, as well as an integer, called the "kerning mode", and a pointer to a destination vector that receives the corresponding distances. The kerning mode is very similar to the "bbox mode" described in a previous chapter. It's a enumeration that indicates how the kerning distances are expressed in the target vector. The default value is ft_kerning_default which has value 0. It corresponds to kerning distances expressed in 26.6 grid-fitted pixels (which means that the values are multiples of 64). For scalable formats, this means that the design kerning distance is scaled then rounded. The value ft_kerning_unfitted corresponds to kerning distances expressed in 26.6 unfitted pixels (i.e. that do not correspond to integer coordinates). It's the design kerning distance that is simply scaled without rounding. Finally, the value ft_kerning_unscaled is used to return the design kerning distance, expressed in font units. You can later scale it to device space using the computations explained in the last chapter of this section. Note that the "left" and "right" positions correspond to the visual order of the glyphs in the string of text. This is important for bi-directional text, or simply when writing right-to-left text.. 4. Simple text rendering: kerning + centering:In order to show off what we just learned, we will now show how to modify the example code that was provided in section I to render a string of text, and enhance it to support kerning and delayed rendering. a. Kerning support:Adding support for kerning to our code is trivial, as long as we consider that we're still dealing with a left-to-right script like Latin. We simply need to retrieve the kerning distance between two glyphs in order to alter the pen position appropriately. The code looks like:
      FT_GlyphSlot  slot = face->glyph;  // a small shortcut
      FT_UInt       glyph_index;
      FT_Bool       use_kerning;
      FT_UInt       previous;
      int           pen_x, pen_y, n;

      .. initialise library ..
      .. create face object ..
      .. set character size ..

      pen_x = 300;
      pen_y = 200;

      use_kerning = FT_HAS_KERNING(face);
      previous    = 0;

      for ( n = 0; n < num_chars; n++ )
      {
        // convert character code to glyph index
        glyph_index = FT_Get_Char_Index( face, text[n] );

        // retrieve kerning distance and move pen position
        if ( use_kerning && previous && glyph_index )
        {
          FT_Vector  delta;

          FT_Get_Kerning( face, previous, glyph_index,
                          ft_kerning_mode_default, &delta );

          pen_x += delta.x >> 6;
        }

        // load glyph image into the slot (erase previous one)
        error = FT_Load_Glyph( face, glyph_index, FT_LOAD_RENDER );
        if (error) continue;  // ignore errors

        // now, draw to our target surface
        my_draw_bitmap( &slot->bitmap,
                        pen_x + slot->bitmap_left,
                        pen_y - slot->bitmap_top );

        // increment pen position
        pen_x += slot->advance.x >> 6;

        // record current glyph index
        previous = glyph_index;
      }
That's it. You'll notice that:
As you see, this is not terribly complex :-) b. Centering:Our code begins to become interesting but it's still a bit too simple for normal uses. For example, the position of the pen is determined before we do the rendering when in a normal situation, you would want to layout the text and measure it before computing its final position (e.g. centering) or perform things like word-wrapping. We're thus now going to decompose our text rendering function into two distinct but successive parts: the first one will position individual glyph images on the baseline, while the second one will render the glyphs. As we'll see, this has many advantages. We will thus start by storing individual glyph images, as well as their position on the baseline. This can be done with code like:
      FT_GlyphSlot  slot = face->glyph;  // a small shortcut
      FT_UInt       glyph_index;
      FT_Bool       use_kerning;
      FT_UInt       previous;
      int           pen_x, pen_y, n;

      FT_Glyph      glyphs[ MAX_GLYPHS ];   // glyph image
      FT_Vector     pos   [ MAX_GLYPHS ];   // glyph position
      FT_UInt       num_glyphs;

      .. initialise library ..
      .. create face object ..
      .. set character size ..

      pen_x = 0;   /* start at (0,0) !! */
      pen_y = 0;

      num_glyphs  = 0;
      use_kerning = FT_HAS_KERNING(face);
      previous    = 0;

      for ( n = 0; n < num_chars; n++ )
      {
        // convert character code to glyph index
        glyph_index = FT_Get_Char_Index( face, text[n] );

        // retrieve kerning distance and move pen position
        if ( use_kerning && previous && glyph_index )
        {
          FT_Vector  delta;

          FT_Get_Kerning( face, previous, glyph_index,
                          ft_kerning_default, &delta );

          pen_x += delta.x >> 6;
        }

        // store current pen position
        pos[ num_glyphs ].x = pen_x;
        pos[ num_glyphs ].y = pen_y;

        // load glyph image into the slot. DO NOT RENDER IT !!
        error = FT_Load_Glyph( face, glyph_index, FT_LOAD_DEFAULT );
        if (error) continue;  // ignore errors, jump to next glyph

        // extract glyph image and store it in our table
        error = FT_Get_Glyph( face->glyph, & glyphs[num_glyphs] );
        if (error) continue;  // ignore errors, jump to next glyph

        // increment pen position
        pen_x += slot->advance.x >> 6;

        // record current glyph index
        previous = glyph_index

        // increment number of glyphs
        num_glyphs++;
      }
As you see, this is a very simple variation of our previous code where we extract each glyph image from the slot, and store it, along with the corresponding position, in our tables. Note also that "pen_x" contains the total advance for the string of text. We can now compute the bounding box of the text string with a simple function like:
      void   compute_string_bbox( FT_BBox  *abbox )
      {
        FT_BBox  bbox;

        // initialise string bbox to "empty" values
        bbox.xMin = bbox.yMin =  32000;
        bbox.xMax = bbox.yMax = -32000;

        // for each glyph image, compute its bounding box, translate it,
        // and grow the string bbox
        for ( n = 0; n < num_glyphs; n++ )
        {
          FT_BBox   glyph_bbox;

          FT_Glyph_Get_CBox( glyphs[n], ft_glyph_bbox_pixels, &glyph_bbox );

          glyph_bbox.xMin += pos[n].x;
          glyph_bbox.xMax += pos[n].x;
          glyph_bbox.yMin += pos[n].y;
          glyph_bbox.yMax += pos[n].y;

          if (glyph_bbox.xMin < bbox.xMin)
            bbox.xMin = glyph_bbox.xMin;

          if (glyph_bbox.yMin < bbox.yMin)
            bbox.yMin = glyph_bbox.yMin;

          if (glyph_bbox.xMax > bbox.xMax)
            bbox.xMax = glyph_bbox.xMax;

          if (glyph_bbox.yMax > bbox.yMax)
            bbox.yMax = glyph_bbox.yMax;
        }

        // check that we really grew the string bbox
        if ( bbox.xMin > bbox.xMax )
        {
          bbox.xMin = 0;
          bbox.yMin = 0;
          bbox.xMax = 0;
          bbox.yMax = 0;
        }

        // return string bbox
        *abbox = bbox;
      }
The resulting bounding box dimensions are expressed in integer pixels, and can then be used to compute the final pen position before rendering the string as in:
      // compute string dimensions in integer pixels
      string_width  = (string_bbox.xMax - string_bbox.xMin);
      string_height = (string_bbox.yMax - string_bbox.yMin);

      // compute start pen position in 26.6 cartesian pixels
      start_x = (( my_target_width  - string_width )/2)*64;
      start_y = (( my_target_height - string_height)/2)*64;

      for ( n = 0; n < num_glyphs; n++ )
      {
        FT_Glyph  image;
        FT_Vector pen;

        image = glyphs[n];

        pen.x = start_x + pos[n].x;
        pen.y = start_y + pos[n].y;

        error = FT_Glyph_To_Bitmap( &image, ft_render_mode_normal,
                                    &pen, 0 );
        if (!error)
        {
          FT_BitmapGlyph  bit = (FT_BitmapGlyph)image;

          my_draw_bitmap( bit->bitmap,
                          bit->left,
                          my_target_height - bit->top );

          FT_Done_Glyph( image );
        }
      }
You'll take note that:
The same loop can be used to render the string anywhere on our display surface, without the need to reload our glyph images each time.. We could also decide to implement word wrapping, and only draw 5. Advanced text rendering: transform + centering + kerning:We are now going to modify our code in order to be able to easily transform the rendered string, for example to rotate it. We will start by performing a few minor improvements: a. packing & translating glyphs:We'll start by packing the information related to a single glyph image into a single structure, instead of parallel arrays. We thus define the following structure type:
     typedef struct TGlyph_
     {
       FT_UInt    index;    // glyph index
       FT_Vector  pos;      // glyph origin on the baseline
       FT_Glyph   image;    // glyph image

     } TGlyph, *PGlyph;
We will also translate each glyph image directly after it is loaded to its position on the baseline at load time. As we'll see, this as several advantages. Our glyph sequence loader thus becomes:
      FT_GlyphSlot  slot = face->glyph;  // a small shortcut
      FT_UInt       glyph_index;
      FT_Bool       use_kerning;
      FT_UInt       previous;
      int           pen_x, pen_y, n;

      TGlyph        glyphs[ MAX_GLYPHS ];   // glyphs table
      PGlyph        glyph;                  // current glyph in table
      FT_UInt       num_glyphs;

      .. initialise library ..
      .. create face object ..
      .. set character size ..

      pen_x = 0;   /* start at (0,0) !! */
      pen_y = 0;

      num_glyphs  = 0;
      use_kerning = FT_HAS_KERNING(face);
      previous    = 0;

      glyph = glyphs;
      for ( n = 0; n < num_chars; n++ )
      {
        glyph->index = FT_Get_Char_Index( face, text[n] );

        if ( use_kerning && previous && glyph->index )
        {
          FT_Vector  delta;

          FT_Get_Kerning( face, previous, glyph->index,
                          ft_kerning_mode_default, &delta );

          pen_x += delta.x >> 6;
        }

        // store current pen position
        glyph->pos.x = pen_x;
        glyph->pos.y = pen_y;

        error = FT_Load_Glyph( face, glyph_index, FT_LOAD_DEFAULT );
        if (error) continue;

        error = FT_Get_Glyph( face->glyph, &glyph->image );
        if (error) continue;

        // translate the glyph image now..
        FT_Glyph_Transform( glyph->image, 0, &glyph->pos );

        pen_x   += slot->advance.x >> 6;
        previous = glyph->index

        // increment number of glyphs
        glyph++;
      }
      // count number of glyphs loaded..
      num_glyphs = glyph - glyphs;
Note that translating glyphs now has several advantages. The first one, is that we don't need to translate the glyph bbox when we compute the string's bounding box. The code becomes:
      void   compute_string_bbox( FT_BBox  *abbox )
      {
        FT_BBox  bbox;

        bbox.xMin = bbox.yMin =  32000;
        bbox.xMax = bbox.yMax = -32000;

        for ( n = 0; n < num_glyphs; n++ )
        {
          FT_BBox   glyph_bbox;

          FT_Glyph_Get_CBox( glyphs[n], &glyph_bbox );

          if (glyph_bbox.xMin < bbox.xMin)
            bbox.xMin = glyph_bbox.xMin;

          if (glyph_bbox.yMin < bbox.yMin)
            bbox.yMin = glyph_bbox.yMin;

          if (glyph_bbox.xMax > bbox.xMax)
            bbox.xMax = glyph_bbox.xMax;

          if (glyph_bbox.yMax &gy; bbox.yMax)
            bbox.yMax = glyph_bbox.yMax;
        }

        if ( bbox.xMin > bbox.xMax )
        {
          bbox.xMin = 0;
          bbox.yMin = 0;
          bbox.xMax = 0;
          bbox.yMax = 0;
        }

        *abbox = bbox;
      }
Now take a closer look, the compute_string_bbox can now compute the bounding box of a transformed glyph string. For example, we can do something like:
      FT_BBox    bbox;
      FT_Matrix  matrix;
      FT_Vector  delta;

      ... load glyph sequence

      ... setup "matrix" and "delta"

      // transform glyphs
      for ( n = 0; n < num_glyphs; n++ )
        FT_Glyph_Transform( glyphs[n].image, &matrix, &delta );

      // compute bounding box of transformed glyphs
      compute_string_bbox( &bbox );
b. Rendering a transformed glyph sequence:However, directly transforming the glyphs in our sequence is not an idea if we want to re-use them in order to draw the text string with various angles or transforms. It's better to perform the affine transformation just before the glyph is rendered, as in the following code:
      FT_Vector  start;
      FT_Matrix  transform;

      // get bbox of original glyph sequence
      compute_string_bbox( &string_bbox );

      // compute string dimensions in integer pixels
      string_width  = (string_bbox.xMax - string_bbox.xMin)/64;
      string_height = (string_bbox.yMax - string_bbox.yMin)/64;

      // set up start position in 26.6 cartesian space
      start.x = (( my_target_width  - string_width )/2)*64;
      start.y = (( my_target_height - string_height)/2)*64;

      // set up transform (a rotation here)
      matrix.xx = (FT_Fixed)( cos(angle)*0x10000);
      matrix.xy = (FT_Fixed)(-sin(angle)*0x10000);
      matrix.yx = (FT_Fixed)( sin(angle)*0x10000);
      matrix.yy = (FT_Fixed)( cos(angle)*0x10000);

      for ( n = 0; n < num_glyphs; n++ )
      {
        FT_Glyph  image;
        FT_Vector pen;
        FT_BBox   bbox;

        // create a copy of the original glyph
        error = FT_Glyph_Copy( glyphs[n].image, &image );
        if (error) continue;

        // transform copy (this will also translate it to the correct
        // position
        FT_Glyph_Transform( image, &matrix, &start );

        // check bounding box, if the transformed glyph image
        // is not in our target surface, we can avoid rendering it
        FT_Glyph_Get_CBox( image, ft_glyph_bbox_pixels, &bbox );
        if ( bbox.xMax <= 0 || bbox.xMin >= my_target_width  ||
             bbox.yMax <= 0 || bbox.yMin >= my_target_height )
          continue;

        // convert glyph image to bitmap (destroy the glyph copy !!)
        //
        error = FT_Glyph_To_Bitmap( &image,
                                    ft_render_mode_normal,
                                    0,      // no additional translation
                                    1 );    // destroy copy in "image"
        if (!error)
        {
          FT_BitmapGlyph  bit = (FT_BitmapGlyph)image;

          my_draw_bitmap( bitmap->bitmap,
                          bitmap->left,
                          my_target_height - bitmap->top );

          FT_Done_Glyph( image );
        }
      }
You'll notice a few changes compared to the original version of this code:
It's possible to call this function several times to render the string width different angles, or even change the way "start" is computed in order to move it to different place. This code is the basis of the FreeType 2 demonstration program named"ftstring.c". It could be easily extended to perform advanced text layout or word-wrapping in the first part, without changing the second one. Note however that a normal implementation would use a glyph cache in order to reduce memory needs. For example, let's assume that our text string is "FreeType". We would store three identical glyph images in our table for the letter "e", which isn't optimal (especially when you consider longer lines of text, or even whole pages..). 6. Accessing metrics in design font units, and scaling them:Scalable font formats usually store a single vectorial image, called an "outline", for each in a face. Each outline is defined in an abstract grid called the "design space", with coordinates expressed in nominal "font units". When a glyph image is loaded, the font driver usually scales the outline to device space according to the current character pixel size found in a FT_Size object. The driver may also modify the scaled outline in order to significantly improve its appearance on a pixel-based surface (a process known as "hinting" or "grid-fitting"). This chapter describes how design coordinates are scaled to device space, and how to read glyph outlines and metrics in font units. This is important for a number of things:
a.Scaling distances to device space:Design coordinates are scaled to device space using a simple scaling transform, whose coefficients are computed with the help of the character pixel size:
     device_x = design_x * x_scale
     device_y = design_y * y_scale

     x_scale  = pixel_size_x / EM_size
     y_scale  = pixel_size_y / EM_size
Here, the value EM_size is font-specific and correspond to the size of an abstract square of the design space (called the "EM"), which is used by font designers to create glyph images. It is thus expressed in font units. It is also accessible directly for scalable font formats as face->units_per_EM. You should check that a font face contains scalable glyph images by using the FT_IS_SCALABLE(face) macro, which returns true when appropriate. When you call the function FT_Set_Pixel_Sizes, you're specifying the value of pixel_size_x and pixel_size_y you want to use to FreeType, which will immediately compute the values of x_scale and y_scale. When you call the function FT_Set_Char_Size, you're specifying the character size in physical "points", which is used, along with the device's resolutions, to compute the character pixel size, then the scaling factors. Note that after calling any of these two functions, you can access the values of the character pixel size and scaling factors as fields of the face->size->metrics structure. These fields are:
Basically, this means that you can scale a distance expressed in font units to 26.6 pixels directly with the help of the FT_MulFix function, as in:
      // convert design distances to 1/64th of pixels
      //
      pixels_x = FT_MulFix( design_x, face->size->metrics.x_scale );
      pixels_y = FT_MulFix( design_y, face->size->metrics.y_scale );
However, you can also scale the value directly with more accuracy by using doubles and the equations:
      FT_Size_Metrics*  metrics = &face->size->metrics;    // shortcut
      double            pixels_x, pixels_y;
      double            em_size, x_scale, y_scale;

      // compute floating point scale factors
      //
      em_size = 1.0 * face->units_per_EM;
      x_scale = metrics->x_ppem / em_size;
      y_scale = metrics->y_ppem / em_size;

      // convert design distances to floating point pixels
      //
      pixels_x = design_x * x_scale;
      pixels_y = design_y * y_scale;
b. Accessing design metrics (glyph & global):You can access glyph metrics in font units simply by specifying the FT_LOAD_NO_SCALE bit flag in FT_Load_Glyph or FT_Load_Char. The metrics returned in face->glyph->metrics will all be in font units. You can access unscaled kerning data using the ft_kerning_mode_unscaled mode Finally, a few global metrics are available directly in font units as fields of the FT_Face handle, as described in chapter 3 of this section. ConclusionThis is the end of the second section of the FreeType 2 tutorial, you're now able to access glyph metrics, manage glyph images, and render text much more intelligently (kerning, measuring, transforming & caching). You have now sufficient knowledge to build a pretty decent text service on top of FreeType 2, and you could possibly stop there if you want. The next section will deal with FreeType 2 internals (like modules, vector outlines, font drivers, renderers), as well as a few font format specific issues (mainly, how to access certain TrueType or Type 1 tables). |